A blog by Dr. Uwe-Klaus Jarosch, August 2025
In many businesses Special Characteristics (SCs) are requested mandatorily.
But what exactly does this mean for the realization on the shop floor?
Repeatedly, a conflict comes up between the “developers” who define Special Characteristics on the drawing and those guys in the production who have to live with SCs, to suffer from SCs.
In ideal case there SCs ” As few as possible, as many as needed.”
In this blog I will present a possible and approved way to asure “as few as possible, as much as needed” based on criteria.
SCs are not a safe guard for the designer.
SCs are only defined to create attention and care in the manufacturing process for those characteristics which would bring functions in later staps or in the use of a product into danger.
Now the Special Characteristic has been determined.
What are the consequences for the daily workflow on the shop floor?
There are two areas to be distinguished:
a) Labeling and documentation
b) To deliver evidence by measurements or inspections.
In some businesses there is the myth: A Special Characteristic must always have records about inspecion by 100% of the produce units
or
must be evidentially capable in a level cpk > 1,33 by qualified, frequent sample inspections.
Of course, you find Special Characteristics where exactly this requirement is given and is reasonable.
But:
There are numerous examples where this requirement is not feasible,
or
where this requirement is far beyond what is needed to meet all targets.
Example: The product is a welded steel part used in an automotive suspension.
The part is safety relevant.
Nobody of us would accept to have a suspension part collapsing when we urgently need to slow down or turn out.
Welding is a highly dynamic process. In large series production many steps are automized. Robots perform the welding supported by electronic control units along a reproducable path. Nevertheless, the supplied single parts will have variations. If you look into the weld seem after welding you find a reasonably high variation of burn in and other measureable characteristics in the run of the weld seam.
These variations on one hand contradict the theoretical requirements. On the other hand, we typically do not find any reduction of loadability of the weld seam by such local variations. The connection works safely over its whole length.
If each weld seam is performed ok may be inspected by costy X-Ray or CT testing without distruction. Or you can do destructive testing by weld cut ups. You will not get evidence just by looking from outside on the weld seam surface.
Therefore: Weld seam specifications as SCs, high number of expensive inspections resulting in a reasonably high variation -> Much effort and the evidence not to (be able to) fulfill requested limits in a capable level.
And now ?
Diese Schwankung widerspricht einerseits den theoretischen Anforderungen. Andererseits ist die Belastbarkeit der Schweißverbindung durch diese lokalen Schwankungen i.d.R. nicht gemindert. Über ihrer Länge hält die Verbindung zuverlässig.
Ob jede Schweißnaht i.O. ausgeführt ist, lässt sich entweder durch teure Röntgen- oder CT-Prüfung zerstörungsfrei
oder durch Schliffuntersuchungen zerstörend überprüfen. Von außen ist das nicht feststellbar.
Also: Schweißnaht-Merkmale als BMs, hohe Zahl von Prüfungen mit hoher lokaler Streubreite -> Viel Aufwand und der Nachweis, dass die geforderten Grenzen nicht fähig eingehalten werden (können).
Und was jetzt ?
There must be a different way to approve the compliance with given Special Characteristics for you as a company and for your customers.
Not every Special Characteristic needs to be handle identically!
Engineering requirements on the drawing need to express what is necessary to get the resulting function safely achieved.
AND
engineering requirments must be feasible in production and testing in a given budget for equipment and workforce.
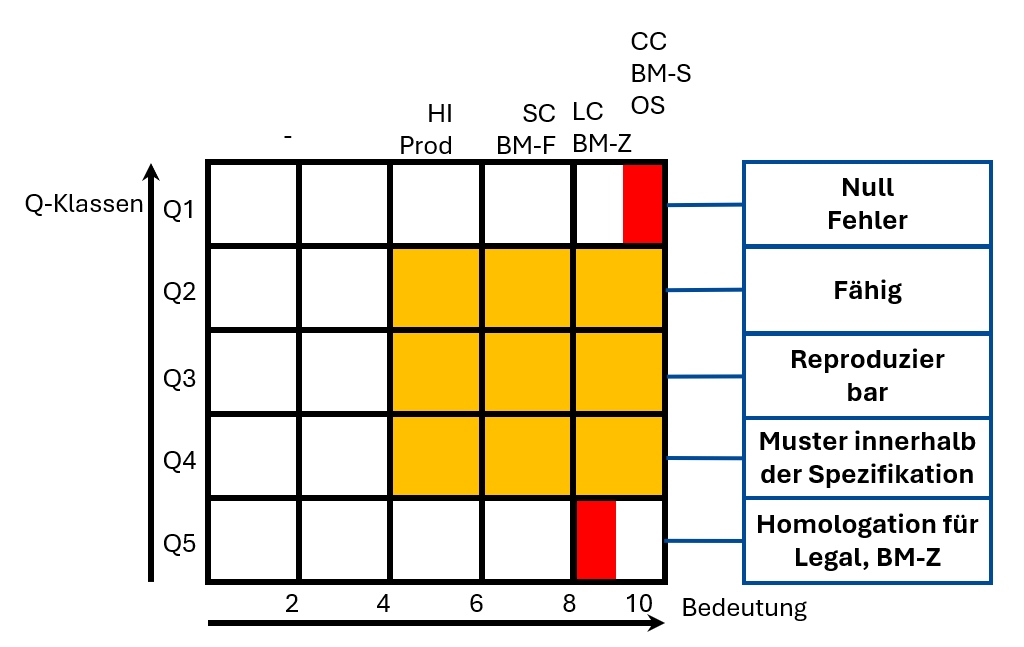
My approach has been approved in practice: Give Special Characteristics not only 1 feature by their classification but determine a section feature by a QUALITY CLASS.
are sufficient to cover all typical cases of special characteristics with individual requirements for approval and documentation.

I would like to start with Quality Class 2.
It requests the evidence of a capable characteristic.
Normally, this means to approve a free of defect result by a 100% inspection
or
a statistical evidence of capability, typically by capabilty index cpk > 1,33.
This is a tough requirement. It means three aspecs:
1) Measurements must be done frequently and with a high level of realiability.
2) The manufacturing process must be aligned exactly in a way to have process variation centered in the middle between upper and lower tolerance limit.
3) De facto, only half of the tolerance range may be used for the process variation. Measurement results near to the specification limits do not result in an NOK part but they will drastically reduce the capability index. You “only” take samples. Therefore, you cannot fully exclude the existence of spikes. The statistical calculation includes this insecurity in relation by the sample quantity.
In a series production you need to achieve capabilty not only once but constantly over time.
You will achieve capability only if you look at ALL potential causes and make all of them (as far as feasible) impossible to occur.
This needs
-> preventive actions which prevent the cause to occur
and
-> detection actions to measure and inspect in order to evaluate the current status and to find failures when they have occured.
In the run of the PFMEA each cause is rated by the team how good the set of actions is expected (later is approved) to work.
These numbers of rating – jointly with the severity of the failure mode – give a risk rating for each cause, not for the entire system.
If the list of details is complete and all details are „safe“, the the entire product, the entire process is „safe“.
Quality Class Q1 is designed for very crititcal special cases.
Here the customer requests to receive the product with this characteristic for sure without failure.
This quality class typically is reserved for safety relevant SCs (=CCs) which in addition are critical in consequence: A deviation directly would have immediate risk of breakdown.
What is a typical handling?
Many applications use the 100% or even a 200% check (2 100% checks in line).
This inspection without gaps ensures to find even non systematic failure modes
(e.g. an issue due to a part fallen down from the desk or having contact with dirt anyhow).
Alternatively, the request is to show capability of an even higher capability indicator.
In Q1 the requirement will be cpk > 1,67 or even > 2,0.
If you raise the cpk value by 1/3 this means to have another time the width of the standard deviation σ between the mean value of the distribution and the nearer tolerance limit.
For cpk = 1,33 the minimum distance is 4x σ, cpk = 1,67 -> 5x and cpk 2.0 -> 6x.
Such a requirement typically requests for a closed loop control for the characteristic in the manufacturing process.
The machine makes a first step, measures the current state, compares with the target and gives a next step parameter. This is repeated until the machine has produced exactly the target value.
We need a short visit in the world of statistics:
furthermore requests for statistics. It demands for a long term compliance with a capability index cp.
The diffferences are cp instead of cpk and the value needs to be less thight, cp >1,0.
The pictures from the distribution curve make it easy to understand that more often this “failure mode”, parts far from distribution mean value are acceptable.
This goes so far to neglect if parts are even out of spec.
Cp in contrast to cpk only requests the measured values to be near together.
cp does not define where the center of gravity in relation to the limits must be. Only the width of the distribution is rated in relation to the limits.
Why that ?
Practically, many machines can be adjusted to a state of input. After adjustment of the tool and the equipment then we expect the shipped parts to look always the same, indifferently where the value is exactly. This is the core issue of Q3: Reproducability over long time.
Not to adjust the machines on and on with each batch of incoming parts or to get faulty parts out of the process it is essential to get parts with small part to part variation, reproducable input parts. This is a major factor to makes the resulting products reproducable as well and to have a stable, capable process.
In Quality Class Q4 we open the level of requirements to the prerunning process further more:
Now our expectation is to get material which is evidentially produced within tolerance.
Just within tolerance would be bad for any statistics.
To check with a go-nogo gauge will be ok in many use cases. Or it will be all what is feasible (remember the example of the weld seams).
For Q4 we are satisfied with a frequent sample check. A 100% inspection is not needed.
Jetzt ist unsere Erwartung, dass das Merkmal nachweislich innerhalb der Toleranz liegt.
Knapp drin wäre für die Statistik in Q1-Q3 immer schädlich. Wenn wir mit einer Lehre nur Gut oder Schlecht feststellen, so ist das für viele Anwendungsfälle ausreichend bzw. alles was möglich ist (siehe das Beispiel mit den Schweißnähten).
Außerdem reichen uns für die Aussage zu Q4 regelmäßige Stichproben. Eine 100%-Prüfung wird nicht verlangt.
Finally we have a Quality Class Q5.
Q5 typically is not related to the ongoing business on the shop floor.
We may have characteristics for homologation, e.g. to show evidence to a public authority or to check characteristics by a test lab in larger timely distance. This can include Special Characteistics with respect to homologation (Legal Characteristics, BM-Z). Or it can be recertification by an organization like TÜV or Dekra to check the product all 1 to 3 years. In B2B relations we find something like annual requalification towards the customer.
If characteristics need to be approved only for such events evaluation typically will be done as an ok-nok sample check.
To make a difference from frequent sample checks in the running production the quality class Q5 was introduced.
We want to be able to assign a quality class to every characteristic with major influence or – after classification is determined – every Special Characteristic.
Für die Zulassung eines Produktes z.B. bei einer Behörde oder den Nachweis des Merkmals bei einer Prüfstelle, die in größerem zeitlichen Abstand Werte wissen will, können ebenfalls Besondere Merkmale definiert werden. Sie betreffen meist die Homologation (Legal, BM-Z) oder den Nachweis beim TÜV oder bei der Requalifikation zum Kunden.
Diese Merkmale müssen daher nur anlassbezogen nachgewiesen werden, in der Regel als Stichprobenprüfung.
Um dies von den regelmäßigen, im täglichen Ablauf nötigen Nachweisen zu unterscheiden, ist die Qualitätsklasse Q5 eingeführt worden.
Schließlich muss jedem Merkmal mit besonderem Einfluss oder – nach Festlegung einer Klassifikatin – jedem Besonderen Merkmal eine Q-Klasse zugeordnet werden können.

Using quality classes we can fulfill the core sentence: “As little as possible, as much as needed” for each SC individually
.
Conclusions:
You can be sure: With this approach you will have a little bit more workload in development but much less resistance to SCs in production and supply base.
Stay curious
Uwe Jarosch
Um Ihnen ein optimales Erlebnis zu bieten, verwenden wir Technologien wie Cookies, um Geräteinformationen zu speichern und/oder darauf zuzugreifen. Wenn Sie diesen Technologien zustimmen, können wir Daten wie das Surfverhalten oder eindeutige IDs auf dieser Website verarbeiten. Wenn Sie Ihre Zustimmung nicht erteilen oder zurückziehen, können bestimmte Merkmale und Funktionen beeinträchtigt werden.